Showing posts with label Christmas. Show all posts

Saturday, August 19, 2017

Christmas Elves Quilt Along: Block 2

This is going to be such a cute quilt! Once again, I'm having way too much fun for an old lady. Instead of sitting on the porch in a rocking chair, I'm playing with my toys and my art supplies and making huge messes just like I did when I was ten years old. 

Block 2, Elf with Reindeer and Companion Blocks
The Pattern 
There is a lot of pattern with this group of blocks - fourteen pages in all. In addition to the templates for the appliques, there are paper foundation piecing  instructions for the tree, the template and instructions for the second version of the tree, and standard piecing instructions for the churn dash block.

I tacked a pinwheel block onto the churn dash blocks. This one is from the first set of patterns, but any 3" block can be substituted. In order to make the churn dash strip the same height as the elf block, I had to add one inch.  Since the points of the pinwheel and churn dash blocks don't touch, two 1/2" divisions worked perfectly to separate the churn dash blocks. If you'd like to use four churn dash blocks instead of the three plus a pinwheel, you would need to use three separating strips. Each would need to finish at1/3 of an inch, so cutting the strips just a hair over 3/4" should do the trick. When sewn between the blocks, the strips would be just that hair greater than 1/4".

When the quilt is altogether finished, I think I'll go back and add little embellishments. There are so many cute Christmas buttons, ribbons, and other little things that will soon be in the shops.

Other details:

I find that I'm using the triple stitch on my sewing machine more and more to replace hand embroidery. This time it made a lovely loop for hanging the ornament on the reindeer's antler.

A bit of colored pencil added color to the elf's face and ears, again. I think a photo here will show up much better than the smaller one included in the pattern.


The wide, close blanket stitches wee just fine for making hooves on the reindeer. The hooves are an easy addition, but not really necessary.


So here we are, almost at the halfway point in this quilt already. If you've joined in, I do hope you're enjoying this as much as I am.


What should go into that middle block? I still haven't decided, so please add your suggestions.


Are you ready for the eclipse? We are right on the path for totality in Lincoln.


I do hope it doesn't cloud over!


Saturday, July 29, 2017

Christmas Elves Quilt Along: Block 1

I had so much fun making this first group of blocks for the Christmas Elf quilt!


Click on this link to go directly to the pattern on Craftsy: Christmas Elves, Block 1

It's ever so scrappy, so I get to play with all of my pretty Christmas fabrics. I like the gray background fabric, too. I was surprised at how nicely it pulls all of the colors and designs in my various fabrics together. There may be more gray in future quilts.

I want the whole quilt, but I can definitely see each of the elf blocks as an independent wall hanging. I wonder how many people will make them that way.

Every quilt has a few little quirks, and this one is no exception. I've tried to include everything in the patterns for the blocks, but some of the details may need more clarification.

1. I think that the trickiest part of the quilt designs is with the ears. The front of the ears need to be snipped down a bit to make space for the hair and hat brim to slip under the ear and fit tightly against the forehead. I didn't photograph every one of the elves faces, but these two pictures should explain.
The snip down the front of the ear lets the hair slide under the ear and over the forehead. 
The ear overlaps the hair and hat brim.
2. The elves look fine without eyes or definite features, but just the slightest enhancement really bring them to life. A simple French knot is all that's needed for an eye, and a tiny bit of colored pencil suggests lips and rosy cheeks. I'm not planning to wash this quilt, but if you do have to wash it, don't worry too much about the pencil washing out. After it's been pressed with a hot iron, it will be fairly permanent.

The colored pencil work really is minimal. In this photo you can also see the way the blanket stitching fit on the ear and hair.

3. The lettering on the North Pole sign would be very hard to embroider after it was fused to the background. Hand embroidery is not easy on thick layers of fusible web. I bit of fabric is lost, but I cut a square of white fabric that was just a bit larger than my embroidery hoop. When I was finished with the embroidery, I ironed fusible web to the back of it. It was easy to work with after that. As a bonus, the embroidery will never pull loose. Those threads on the back are fused right along with everything else.


4. The paint can was fun. Sometimes  a marker is the best solution, although machine lettering would have been lovely, too. I could have drawn the handle with a marker too, but machine triple stitching was fast.

The right edge of the paint at the top of the can is tucked into the can rather like the hair is tucked behind the ear.
In case you were wondering, this is how Block 1 and it's smaller blocks will fit into the whole quilt. The quilt will be 29" x 33" before sashing is added around the outside.


Stay tuned.
Block 2, the Elf with the reindeer, is coming in three weeks!

Happy Stitching!! 


Sunday, July 23, 2017

Christmas Elves Quilt Along: Tips and Ideas For Getting Started

The Christmas Elves quilt along begins in earnest next Saturday.

If you're thinking about making the quilt, the following information might be helpful. I've shared some of these ideas on my Facebook page and in various blog posts that I'll refer you to.

Fabrics Used
  • Most of the fabrics are scraps of Christmas fabrics and other bits and pieces that I've collected over several years.
  • The gray background fabric is "Gray Snow" from the Holiday Traditions collection for Henry Glass. I found it at my local quilt shop, and I bought 2 1/2" yards just to be sure I'd have enough. 
  • I got 1 yard of pink and red candy striped fabric. I'm planning to use it for binding and, possibly, for a narrow border, so I may have quite a bit leftover. The fabric is from "Cozy Christmas" by Lori Holt for Riley Blake Designs. This is from last year's collection, so I ordered it online.
Working With Fusible Web Applique

If you are new to using fusible web or if you'd like a quick refresher on the basics, you can visit an earlier page on my blog. It covers most of the tips for using fusible web. Topics include: choosing the right fusible web, cutting out applique pieces, protecting your iron, easy removal of the web's paper backing, and thread choices. Click on this link to go straight to the page.  Tips for Using Fusible Web

This quilt is quite detailed, so I'm strongly recommending that an applique pressing sheet or a piece of non-stick baking parchment be used to make the fusing and assembly easier.
  • You can see through the sheet. If you place the layout plan under the sheet, you can fuse  the appliques right on the layout.
  • It's often easier to fuse smaller sections of the applique together and then add them to other sections to make the whole applique piece.
  • Pieces of applique can be assembled separately and then combined into the whole.

Pieces of Block 1 ready to assemble
    The head was fused together first.

    Assembly line packages
    Stitching the Appliques in Place

    I almost always prefer a machine blanket stitch for stitching the appliques down, and that is what I've used throughout this quilt. I like the finished look on the edge of the applique. The width and length of the stitch may need to be altered - narrower and shorter for small pieces with tight curves, a bit larger for less detailed pieces. Zigzag stitching works well, too, but with either type of stitching, it really helps to practice on sample pieces. The main thing to remember is that you need to pivot often to go around curves or turn corners. Also, the pivot should only be made on the outside edge of the applique and with the needle down. A couple of years ago I created a tutorial for using the blanket stitch. Click here to view it. Machine Blanket Stitch Applique


    Hands and Faces

    Any number of fabric colors from light pink to dark brown can be used for hands and faces. It all depends on the skin tones you prefer to use. I've never been able to find the exact shades that I prefer, so I've learned a trick or two. I start with a peach Kona Cotton and a few tea bags. Hot tea will dye the peach into a much more natural color. Stronger tea or the addition of coffee will make slightly darker tones.  I know that tea and coffee stains can be hard to remove, but I'm not sure how well the colors will hold up when laundered. I don't plan on washing this quilt, though, so I'm not concerned.

    An earlier blog post explains the process in detail.  Click on this link to view it. A Christmas Elf and a Trick or Two

    A bit of colored pencil brightened up the faces. It was like being back in elementary school. Once done, the pencil can be set with a hot iron.


    The pattern for Block 1 and it's sashing pieces will be ready for you next Saturday. I'll include specific information for making that group of blocks in my blog next week.

    Wishing you a lovely July week.


    Sunday, July 16, 2017

    Christmas Elves Quilt Along: Introduction

     Are you ready for a Christmas adventure? It's quilt along time.
     Join me in making a super fun, super cute, Christmas wall hanging.

    I know, it's the middle of July and Christmas is a whole 1/3 of a year away, but I'm wasting no time on getting this quilt along off the ground.

    These are the four main blocks that will comprise this wall hanging - four busy little elves. Christmas is all year round at the North Pole. Right now the blocks are pinned to my design board. Sashing blocks will be designed as we go.

    Here are the details.

    The main blocks will be published, one every third Saturday, starting on July 29th.  Sashing sections will come with each block. Each set, block plus sashing, will sell for $3.00.
    The final block and the construction of the quilt will be free, and will be published at the end of October.

    As we go, I'll update my blog with special instructions or information about how to work with specific parts of the quilt.

    The final layout will look more or less like this. There may be some minor changes, but the size should not vary by more than an inch in either direction.


    Mark your calendar with the dates:
    • July 22, preliminary tips for working with the blocks
    • July 29: Block 1, Elf painting the North Pole sign
    • August 19: Block 2, Elf with the reindeer
    • September 2, Elf carrying packages
    • September 23, Elf checking the list  
    • October 14, the center block and assembly
    I do hope you join in! Each of the blocks is very sweet on it's own. You can either make you favorite block and surround it with a pretty border for a small wall hanging, or you can journey with me and make the entire quilt.


    Close ups of the blocks:


    Happy Stitching!!

    Sunday, July 10, 2016

    Christmas in July


    It's July, and it may be hot and humid in Nebraska, but it really is time to start thinking about Christmas projects. I had planned to have new patterns ready by now, but life got in the way. Funny how that happens.

    So, instead of showing you brand new ideas, I've placed some my favorite holiday patterns and tutorials in this blog post so they can be more quickly located. I've tried to pick patterns in a variety of styles, sizes, and color schemes. Links are included.

    Most of the patterns here can also be located under the label "Christmas" on the right hand side of this page.

    For other ideas, feel free to visit my pattern page on Craftsy. http://www.craftsy.com/my/pattern-store

    I wish you a wonderful second half of summer! 

    Patterns Available for Purchase on Craftsy

    Candlelight: wall hanging or table topper

     http://www.craftsy.com/pattern/quilting/home-decor/candlelight-table-runner--bonus-mug-rug/1686
     Snow
    Snow Family: wall hanging or table topper
     http://www.craftsy.com/pattern/quilting/home-decor/snow-family-holiday-wall-hanging/113625

    Ice Skates: wall hanging or table topper
     http://www.craftsy.com/pattern/quilting/home-decor/ice-skates-table-topper-or-mug-rug/154260

    Holiday Toys, Soft Christmas Ornaments
    http://www.craftsy.com/pattern/sewing/home-decor/holiday-toys-soft-christmas-ornaments/164087


    Holiday Tabletop Trio: wall hanging or table topper
    http://www.craftsy.com/pattern/quilting/home-decor/holiday-tabletop-trio/123210

     Christmas Houses: wall hanging or table topper
     http://www.craftsy.com/pattern/quilting/home-decor/christmas-houses-table-runner/60384


    Let's Rock: mug rugs
     http://www.craftsy.com/pattern/quilting/home-decor/lets-rock-mug-rug-trio/165562


    Wrapped and Ready: mug rug
     http://www.craftsy.com/pattern/quilting/home-decor/wrapped-and-ready-mug-rug/120846

    Ready for Takeoff: mug rug
     http://www.craftsy.com/pattern/quilting/home-decor/ready-for-takeoff-christmas-mug-rug/66372

    Holiday Rag Doll: mug rug
     http://www.craftsy.com/pattern/quilting/home-decor/holiday-rag-doll-mug-rug/57913

    Winter Romance: mug rug
     http://www.craftsy.com/pattern/quilting/home-decor/winter-romance-mug-rug/64236


    Tutorials on my blog:

    Holiday Gift Bags
    http://klee2strings.blogspot.com/search?q=Taking+Care+of+Essentials+with+French+Braid+Oven+Mitts

    French Braid Oven Mitts
     http://klee2strings.blogspot.com/search?q=Taking+Care+of+Essentials+with+French+Braid+Oven+Mitts

    Home for Christmas: lap quilt
    http://klee2strings.blogspot.com/search?q=home+for+christmas

    New Toys, Part 2: constructing the styrofoam wreath used with "Holiday Toys"
    http://klee2strings.blogspot.com/2015/09/new-toys-part-2-constructing-styrofoam.html


    Monday, December 7, 2015

    'Tis the Season: Scrap Busting Gift Bags Tutorial

    I'm working on my final holiday shopping list.  Gift bags for little stocking stuffer items are on my list, but they seem like such a waste of money. However, I already have a drawer filled to overflowing with leftover fabric from Christmases past. This super quick pattern was just what I needed to bust my stash and to have reusable gift bags at absolutely no cost.

    Sunday night, while watching a silly holiday movie, I chose the fabrics and cut out the pieces I'd need for these six little bags.  Monday, in under three hours, I completely finished all of them. The sewing, ribbon and all took less than half an hour per bag.


    Finished Measurements

    These bags are 9 1/2" wide and 10" tall. The base is 4" x 5". They are large enough to hold a large mug and assorted goodies, a scarf or a pair of gloves, a mini loaf of pumpkin bread, or an assortment of all sorts of other goodies. The top can be left open for larger items or pulled snuggly together for smaller items.
    The white mug is a standard 12 oz size, 4 inches tall and 3 1/2" in diameter at the top.

    Fabrics and Materials
    • For the outside of bag: Either one fat quarter of fabric or two rectangles 9 1/2" x 13"
    • For the lining: Either one fat quarter of contrast fabric or two rectangles 9 1/2" x 13"
    • Two 28" lengths of ribbon for the drawstrings, 5/8" or 3/4" wide. (With a satin or other smooth surfaced ribbon in the drawstring carrier the bag will slide open and closed easily. A textured ribbon like a grosgrain will tend to make opening and closing the bag a little bit harder.)
    • Thread
    • Fray Check (A half and half mixture of Elmer's glue and water can be substituted for Fray Check

    Cutting

    •  Cut two rectangles, 9 1/2" x 13", from the main fabric and two of the same size from the lining fabric.
    • Cut two strips of contrast fabric, 1 1/2" x 9".
    • Cut and remove a 2"x 2" square from each corner of the bottom end of each rectangle.


    Sewing Instructions
    Sew all seams with a 1/4" seam allowance.

    1. Fold the long edges of the 1 1/2" x 9" contrast fabric strip in 1/4". Press. Fold the two ends in 1/4". Press and stitch the two ends down.


    2.  Align the top edge of a prepared contrast strip 2 1/4" down from the top of each piece of the main fabric. Center the strip 1/2" in from each side. Topstitch the long sides of the strips down with a narrow edge seam. Leave the ends open. These two strips make the carriers for the drawstrings.


    3. With right sides together, sew the side seams and the seam at the bottom of the bag.

    4. Sew the lining fabric in the same way, but leave a 2" space open along one side seam. This opening will be used to turn the bag when it's finished.  


    5. Press all seams open. Press the edges of the opening in the lining back so they are even with the seam allowance.


    6. Bring the side seams and the bottom seam of the 2" x 2" squares at the bottom of the bag together. Stitch straight across to make the boxed corners.


    7. Turn the lining right side out and fit it inside the main bag. Line the seams up, and sew the bag and the lining together at the top.


    8. Turn the bag right side out by pulling the entire piece through the opening in the side seam of the lining.

    9. Close the opening with hand stitching, or machine sew it together with a narrow edge stitch.


    10. Fold the lining to the outside of the bag and press the top seam flat. I pressed the lining to lie just barely below the main fabric.


    11. From the front of the bag, topstitch right next to the upper edge of the carrier. Stitch all the way around the bag in one continuous seam.


    12. Turn the bag right side out.

    Inserting the ribbon for the drawstrings

    1. Attach a safety pin to an end of one of the ribbon pieces. Begin on one of the carrier side openings. Insert the safety pin and pull the ribbon through. Cross to the next carrier and continue pulling the ribbon through that one, bringing the ribbon out on the same side that it went in.


    2. Pull the two ends of the ribbon so the ends are even. Hold the ribbon ends together, make a loop and pull the ends through to tie in a knot.
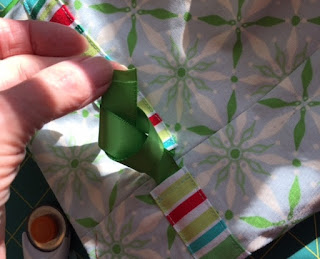
      

    3. Insert the second ribbon exactly like the first, but start on the other side of the bag.
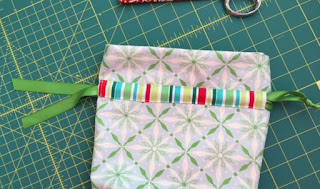
      

    4. Trim the ends of ribbon close to the knots and dab with a bit of Fray Check to prevent fraying.

    5. Pull on the ends of the ribbons to close the bag.


    Enjoy!!